Showing posts with label tops. Show all posts

2015/01/21

Sewn // Self-drafted Patchwork Batwing Top

Patchwork batwing top by Pearls & Scissors
First off, guys, I just wanted to say a big thank you to all who have already participated in the reader survey. I've been loving reading through the answers. If you haven't gotten around to it yet, there's still time, so here is the link again.

Now, to todays project. This one has been on my mind for a long time. Actually, ever since I purchased a batch of industry leftover turquoise knit fabric scraps about 1.5 years ago. They were these long narrow strips, all about 20-25cm wide and about 1m long. I immediately fell in love with the softness of the fabric and the beautiful color. I had no idea though how to make use of these scraps. But, as with most things in my stash, an idea always emerges, I just have to wait for it.
Patchwork batwing top by Pearls & Scissors
And, as it goes, I had this idea one day. Why not sew the strips together and make one big piece of fabric to cut from? I almost loved the idea. But, I didn't like the thought of the seams running vertically across the garment. To fix this issue - why not cut the garment out diagonally? Boom! I had the perfect pattern in mind. A batwing top. It's easy, and doesn't have many seams. Too many seams would break up the already seam-full fabric and look sloppy.

Now that you're all caught up with my thought process...
Patchwork batwing top by Pearls & Scissors
I decided to draft my own pattern for this one. One of my goals for this year is to develop easy ways to draft simple patterns myself, and share them with you. So, a tutorial for the construction of your own batwing top is in the works and coming soon!

I sewed the top from start to finish only using my serger/overlocker. That little machine is my best ever sewing related purchase. So, if you're on the fence about getting one, I can't recommend it highly enough. To those who don't own a serger, I'll have tips to sew this on a regular sewing machine in the upcoming post.
Patchwork batwing top by Pearls & Scissors
Once I had done a little quilting and had my fabric in one piece, the rest of this top came together really quickly. There was a lot of fitting when I was cutting the pattern pieces since there was still fairly little fabric to work with, but I managed to make it work. There were only tiny scraps left when I was done. I love it when a project uses up all the fabric.

The only problem I had during construction was the neckline. And, I'm not loving the result. It's a bit too gaping. I cut the neckline too wide and deep, and since I couldn't cut the neck-band cross-grain, it didn't stretch enough for a snug-fitting neckline. Well, you win some, you lose some...
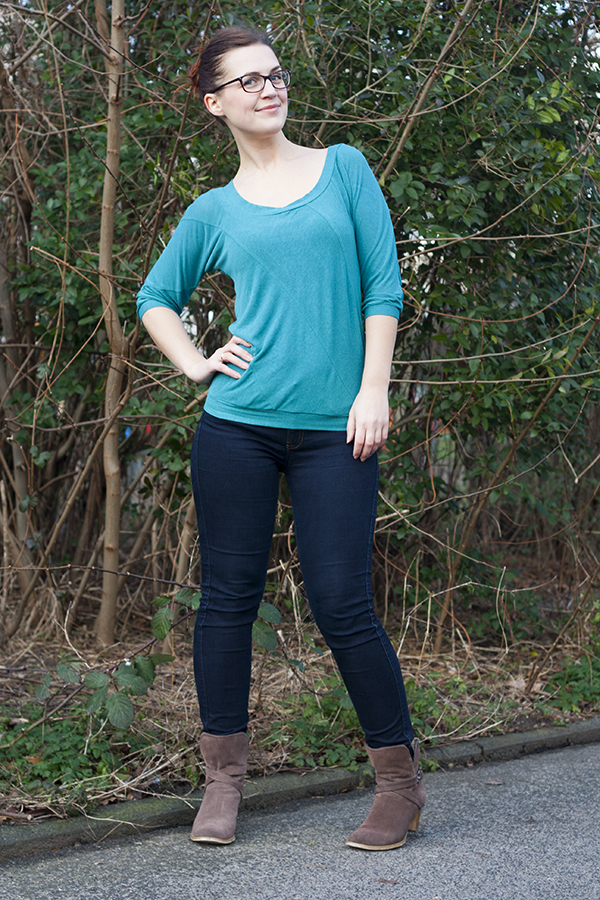
Patchwork batwing top by Pearls & Scissors
Overall, I'm loving my new top. The neckline aside, it came out exactly as I envisioned it in my head. It's a big win when that happens, don't you think? I mean, I remember my first few years sewing. Rarely anything turned out exactly as I thought it would. But, with every project, the percentage of success increases. And that's the really awesome part of developing my skills as a seamstress. 

What are you sewing these days?

xo. Hanna

2013/08/17

Lighthouse style & new lace back tank top


I visited Estonia's second largest island last weekend. It was a fun trip full of beautiful shorelines, lighthouses and sights worth seeing. I shared a few pictures in my last refashionista post, but since the tank top I was wearing is also a recent make, I thought it deserved it's own post along with the whole outfit I was wearing that day.


This tank top is my umpteenth make of the Burda tank top pattern (find details of the pattern and similar patterns in this post). I've used it so many times I've lost count (see here, here, here, and here for previous makes). It's by far the most useful pattern I have. This time I used only the front pattern piece just like I did when making the maxi dress, only I lowered the neckline in the back and raised it in the front. I didn't dare to lower it in the back more in the fear of exposing my bra, although now I know I could have.

This top is also a stash buster. I used the last of the stretchy lace and also all the remnants of the white jersey I got from a thrift shop (both previously used in the making of this t-shirt). I'm really happy with the way this top came out! Happy weekend, my friends!

Outfit details:
Skirt - refashioned
Tank top - made by me
Jacket - H&M from 8 years ago
Purse - thrifted
Earrings - made by me
Necklace - vintage from my Grandma


2013/01/28

Refashionista: Lace heart sheer back tee


Welcome to the first themed week on Pearls & Scissors! Doing themed weeks was one of my goals for the blog this year, and here's the first of the series. Since Valentine's Day is just around the corner, I thought a Valentine's themed week would be just the right fit. So, over the course of the week I'll share some sweet projects to prepare for Valentine's day.


The first project is this cute lacy refashion. It's one of those really simple 30-minute projects that adds so much to a simple garment.


The process is really simple:
1. Take a simple t-shirt and measure the width of the back. Now draw a heart shape on paper a little bit narrower than you shirt back.
2. Place the heart template on the back of your shirt (turned inside out) and use a fabric marker/tailor's chalk or a chip of soap to trace the heart shape onto the shirt.
3. Take you lace fabric (preferably with some stretch in it) and place it over the heart shape. Make sure it cover the markings. Pin into place about an inch from the heart shape. If you can't see the heart shape through the lace trace it onto the lace as well. You have to see it to be able to trace it when sewing.
4. Sew along the markings with a zig-zag stitch. When sewing knits, make sure to use a needle suitable for knits, otherwise you could have trouble with skipped stitches. Once you've done with the sewing, turn the shirt right side out, and cut out the the heart shape inside the seam. Make sure you cut as close to the seam as possible.

It's the same basic method I used in this tutorial as well.


I'm very happy with this simple refashion. I have another cute top in my wardrobe, and I used only thrifted materials, which is just an added bonus in my mind. I think it makes a perfect piece in a Valentine's day outfit.

2013/01/07

Refashionista: How to turn a long-sleeved jersey shirt into a t-shirt


After this project was featured on Merrick's blog, some of you asked for a tutorial. When I first posted about it, I thought this might be a little too specific, but since you asked, I put together a little tutorial of the transformation process.


2012/10/15

Refashionista: Men's T-shirt into Workout Tank


We all have them stashed somewhere. Old boyfriend's/Dad's/brother's t-shirts. But sometimes they can provide you with great material to refashion. The idea is simple - take a t-shirt, cut it into a tank and you've got yourself a new workout shirt!


I hate working out! (hence no biceps) OK, hate is a strong word... I dislike exercising, but I understand the importance of it. And since we have a dance sort of class in our curriculum, I needed some sportswear. I had just the t-shirt for this refashion straight out of my boyfriend's closet. I actually bought this tee for him in Iceland a couple of years ago, but it got really short and wide in the wash and he couldn't wear it anymore. But now it has a second life. And hopefully this one will be a little longer than its first.

2012/10/08

Refashionista: Lace embellished Tee Tutorial (from H.E.R. archives)


This was my first and to this date the most popular tutorial I have made. So, I thought it would really be a crime not share it with you.


Lace can make a simple t-shirt so much more special and elegant. I'm not a t-shirt+jeans kind a gal, I usually don't wear simpel t-shirts, and that's exactly why I'm thinking of ways to make them just a little bit more special. If you're like me, I think you're going to love this tutorial. And this one.

Be sure to click "read more" to see the full tutorial.

2012/10/01

Refashionista: Upcycled tank top


Today I'm sharing another total reconstruction refashion. Every once in a while I use pre-loved clothing just for the material. I love a simple refashion any day, but sometimes a more radical change is in order. Like I showed you last Monday as well.

This beautiful long-sleeved tee was actually in very good shape and someone could have easily worn it, but its previous owner had grown tired of it (as we all do eventually) and gave it to me. I loved the material from the first touch, but it took me a while to figure out what to make out of it. Until one day the light went on and I turned it into a tank top.


I use the simple Burda tank top pattern again (I think it's my most used pattern ever). I added the cut out heart detail for visual interest and cuteness (tutorial here).


I made the back of the tank, the binding and the bottom edge out of the tee and used a jersey knit from my stash in complimentary color for the front piece. You could also use another used t-shirt to harvest the fron piece fabric from.

That's the refashion inspiration for today! I also have a very cool and useful upcycling project for you tomorrow, so be sure to stop by.

2012/09/24

Refashionista: Floral dress to peplum top

Happy Monday everyone! And mondays mean refashions here at Pearls & Scissors. Today I'm sharing a total reconstruction project. It's too specific to make into a tutorial, but I thought I'd give you a little refashion inspiration.


Sometimes there is really no way of fixing a garment the easy way. This floral dress was just such a case. It had lost it's shape and it didn't look pretty on me either. But the moment I saw it in a local reuse center I fell in love with the pattern of the fabric. Such a pretty floral pattern, and I had just the perfect project in mind for it. I knew it would make a very pretty peplum top. I was reassured by the making of my first peplum top that it was a very good silhouette for my body type and I knew I wanted to make one more.

Now, I know it's way past summer in these parts, but I think a sleeveless top like this can easily be transitioned from summer to fall by adding a cute cardigan or jacket. Either way, when I get inspired, I want to make it no matter the season. And I'm glad I did!


I did a complete reconstruction with this one. I cut apart the whole dress and recut the pieces with my peplum top pattern I combined from a simple tank top pattern from Burda and Victory pattern's Ava dress skirt panels.


I used an old white t-shirt to cut the binding for the armholes and neckline. I love when I can make a project using only the things I already have. Oh, and I got the dress for free from the center for buying a big box of buttons. So all in all the material cost of this top was 0€.


I'm rocking the top with my pearls & scissors earrings and the recycled braided bracelet (tutorial here).

How was your weekend? Mine was super creative and I have several awesome crafty projects lined up for you over the course of the next couple of weeks.

2012/09/10

Refashionista: Zipper Tee Tutorial (from H.E.R. archives)


Today I'd like to share a quick and easy refashion idea from H.E.R. (my previous blog) archives. This is another perfect beginners project. It's super easy,cheap, and you can whip it up in half an hour. And, you don't have to be sewing savvy. All it needs is strait seams that you can do by hand if you don't have a machine.

Be sure click "read more" to see the full tutorial.


2012/09/03

Refashionista: Vintage long-sleeved jersey shirt transformation


Happy first day of school to all the school kids! I'm so excited to go back to school and hopefully I can share some snippets of my first school week coming Sunday. But, for today, it's another round of refashionista.
I got the sweetest e-mail yesterday from a friend telling me how inspiring my blog is to her and how she has started refashioning herself. That just makes me super happy! It really does, because that's what blogging is all about for me. Spreading the enthusiasm and creative energy and inspiring others to give a go at making something with their own hands. It's such a gratifying feeling. So, if you haven't already, make that first step/project and you won't be sorry.


Today's refashion might be a little bit more specific, because I don't know how many of you have these types of shirts at home or have seen them in thrift stores. It's a collared long-sleeved shirt made of jersey knit. These were common in the old USSR, but I'm not so sure about the rest of the world. For this reason I didn't put together a tutorial. But, I did take some pictures during the construction process, so if there's enough interest, I can give you the step by step.


The shirt was given to me by my grandmother. She said both her and Grandpa had the exact same shirt (what?). So there should be another one somewhere in the closets.


The idea to turn it into a t-shirt came the moment I saw the shirt. The material is just great - it has some stretch in it and it doesn't wrinkle. But, when I was done with the shirt I didn't quite see myself wearing it. That happens sometimes, the idea is good and all, but it's just not for me. So, I gave it back to my grandmother. She looks great in it! Another full circle. Love when that happens.


Oh, and the earrings in the pictures will soon be in the shop. I'm having a bit of parting anxiety, I just don't know how I'll be able to part with all the buttons.

What do you think about the refashion? In your ballpark or not? Have you seen these types of shirts? Would you be interested in a tutorial? Tell me in the comments!

Update! You can find the tutorial for this refashion HERE.

2012/08/29

Wardrobe Reinvention: 5 Ways to Wear the one-shoulder ruffle top


It's time to reinvent my wardrobe once again. This time I combined 5 outfits using my one shoulder ruffle top that I made about a year ago. Since then it has gotten ridiculously few wares, so it's time to bring it out and let it shine. The problem with this top is really very easy - I made it for a festive occasion and have associated it with formal wear ever since. I find it hard to create an outfit with it that I could wear to school every day, and that would enable me to get more use out of it.
To hear more about the outfits and what I learned, click "Read more" below.


2012/08/26

Refashionista: Lace heart cutout tee


Today's tutorial is simple, quick and smokin' hot. If you're new to the refashion business, a good old t-shirt makeover is just the place to start. It doesn't require a lot of sewing experience or skills. And, all you need is a simple t-shirt and a bit of stretchy lace. Oh, and the fun part? The heart changes color (wink wink)!

If you want to make your own, make sure to click "read more" below!


2012/08/22

White Lace Peplum Top


From time to time I'm going to share my sewing projects and creations with you. As I've gone more and more into refashions, I've sewn less from scratch. And, for the past year I've mostly sewn for other people and my shop, so I've created very little for myself. Well, that's about to change. I'm determined to sew for me more, and to create the wardrobe I'd love.


Yet, this top was originally meant to go to one of my best friends. My girls were in Tallinn this weekend and she made a joke about wanting me to sew her a top. Well, I thought why not?! Unfortunately (or, fortunately, lol) the outcome didn't fit her right. So, I made a few alterations and this gorgeous top was all mine.


I used a cream white stretch lace and a matching jersey knit for the lining. I made the back sheer just for fun. This was actually what caused the misfit for my friend. If you have a big bust, it's wise to check that the front and back have the same stretchiness. My lace had way more stretch than my jersey knit and that's where the problems started.


I created the pattern using a simple tank top pattern from Burda. You could also trace one of your existing tank tops to get the pattern. For the peplum I used the skirt panels form Victory patterns Ava. I just put the center and side pice together making one pattern piece and cut it on fold. I think it would also be rather simple to develop your own pattern for this. It should be half a circle. The principles are the same as developing a circle skirt pattern. There are lots of helpful tutorials for that.


To be honest, I hadn't made myself a peplum top because I was afraid the peplum would accentuate my pear-shaped body. But, I'm actually very happy with the outcome and I think it gives more focus to my tiny waist than my wider hips. So, another peplum top might be in my near sewing future.
Previous Post Home