2015/04/04

March Income Report


Welcome to my second monthly income report! A little over a month ago, I decided to document my journey from zero to business by making monthly income observations, and dishing out all the numbers in these income report posts. I know money is such a loaded topic and my aim is not to boast about sales or anything like that (not that I have anything to boast about just yet), but to shed some light onto the mysterious art of making money with a blog or an online business. Also, it's a way for me to hold myself accountable. So, if you missed last months post, you can find it here.

First, I'd like to give you a little review of what's happened over the last month in my business. March was definitely a turning point for me, although that doesn't manifest itself financially just yet. The turn happened more in my own mindset. After realizing the effect my attitude had on my blog traffic, I was ready to see this more as a business. The biggest game changer last month was joining B-School. I'm sure that a lot of you would want to bitch slap me after you see the numbers below and might not understand my decision to basically go into debt and invest in B-School. All I can say is that I had a very strong gut instinct about joining B-School and I was at a point where I knew I needed massive reinvention in my business. That just seemed the right step at the time, and even though it's put me in an even tighter spot financially at this point, I feel I'm finally on track with building a profitable business out of this blog. So far, I have not regretted that decision.

The biggest mind shift that's grown out of B-school so far is realizing that the blog is NOT my business. What I mean by that is that if I rely on monetizing my blog for my income (sponsored content, advertising, affiliates), I might never make it, because those streams of income rely on heavy traffic. That kind of traffic, however, takes a long long time to build up. So, I've looked long and hard at my strengths and passions and thought about how I could build my business around them. The blog is not going anywhere, but I'm finding ways to compliment the blog with offers that would interest and help you.

I'm very much in an experimentation phase with my business right now. I'm trying to take everything as a lesson, even the failures that occur. I have some very exciting things in the works right now which I'll talk about soon on the blog, but for now, let's talk numbers!

Blog stats in March:

Pageviews (3/1 until 3/31): 61 866 (slight decrease compared to February)
Unique visitors (how many different people visited the site): 17 120 (slight increase compared to February)

Money made:

1. Etsy shop - 237.14€
2. Sovrn ad network - 3.63€
3. Adsense (sidebar ads) - 17.74€
4. Article for Mood - 45€
5. Amazon.com affiliate program - 0€
6. Blog sponsors - 32.22€
8. Embroidered leather watch (sold on blog) - 36.72€

Total: 381.45€

Money spent:

1. Etsy fees - 57.38€
2. Shipping fees - 15.8€
3. Material for e-book - 72.91€
4. Materials for projects - 9.9€
5. eJunkie (shopping cart system for the book) - 4.59€
6. Bluehost (web hosting) - 9.3€
7. Paypal fees - 7.48€
8. B-school tuiton fee - 498.63€
9. Charity donation from e-book - 4.5€

Total: 680.49€

Bottom line: -299.04

Yes, I spent way more than I earned last month. I could've just leave out the B-school investment, but since it is a business investment, I still wanted to include it. Building a business takes time and investments, and I felt that I was lacking a lot of knowledge about doing business online (I'm the worst salesperson for example), and I needed to make some changes in that department. Sure, there are other more affordable programs out there, but you have to go with what you believe in, because the trust in the system is half the battle. So, I chose B-School and am happy with the decision despite it's initial blow to my bottom line.

I spent quite a bit of time over the last month figuring out the best ad networks a craft blogger could use. Turns out there are a lot of publishing networks where bloggers can find sponsored work. However, those are almost exclusively open to US residents only. So, being a blogger in Europe leaves me out of that possible income stream. 

I experimented with Sovrn ad network, and although the cost per thousand impressions (pageviews) is much bigger than in Adsense, it's fill rate (meaning how many impressions actually get served ads) is so low, that I only made under 4€ in the entire month. I don't even know what to think about that. Since Adsense covers the rest of the impressions, I think I'm going to leave it up for another month or two and see if it improves or not.

My Adsense revenue has gone down compared to February due to removing one of the ad units from the sidebar. To be honest, I don't really like serving ad network ads. I'd much rather work with small businesses and blogs that have the same target audience as I do - that would be so much more beneficial to both sides. I did put together a new ad program for the blog, so if you have a small business or a blog, do check it out. In March, Josephine Yarns (Ana and her Mom sell quality, eco-friendly yarns) joined as a sponsor, for example. 

Now, let's get to the biggest disappointment of the month. My DIY home decor e-book. Honestly, I don't even know where to begin. I'm not going to lie, this was a painful blow to take. I didn't invest millions of euros into it, sure, but I was still hoping to make some profit. I put a looot of women-hours into it, and truly tried to make it something worth  the money. Somehow, though, it seems that you are not that interested in it. I talked to a few of you about this subject, and got the feedback that they would see more value in it, if it was an e-course. This was such an interesting thought for me. Would it have sold more, if I had put all the same material onto a members-only site and named it an e-course? For me, the difference between an e-book and e-course is not the depth of content - there are e-courses that cover less than some e-books. It's more about what material fits what format. I thought getting a PDF with all the projects to your computer would be easier for this type of content than for you to log-in to a site every time you want to reference a project. 

Creating the e-book gave me a lot of food for thought, though. Of course, there are more reasons behind the fail than just the format. The take-away for me is to think more about what you would actually be willing to pay money for before I make a product.
On the bright side - I learned how to make an e-book.

Last, but not least, if you've been following the blog over the past month, you know I closed down my Etsy shop for good at the end of the month. I feel very good about that, actually. It's freed up so much mental space for new ideas. I should have let it go sooner, but, I guess I needed the extra time to be ok with this decision.

Whew! I guess that's all I have to say about last months earnings. You're a real champ (or just really curious) if you've made it this far. 

Thank you for sticking around, and let's hope I have a more cheerful income report for you in just a month!

xo. Hanna

2015/04/03

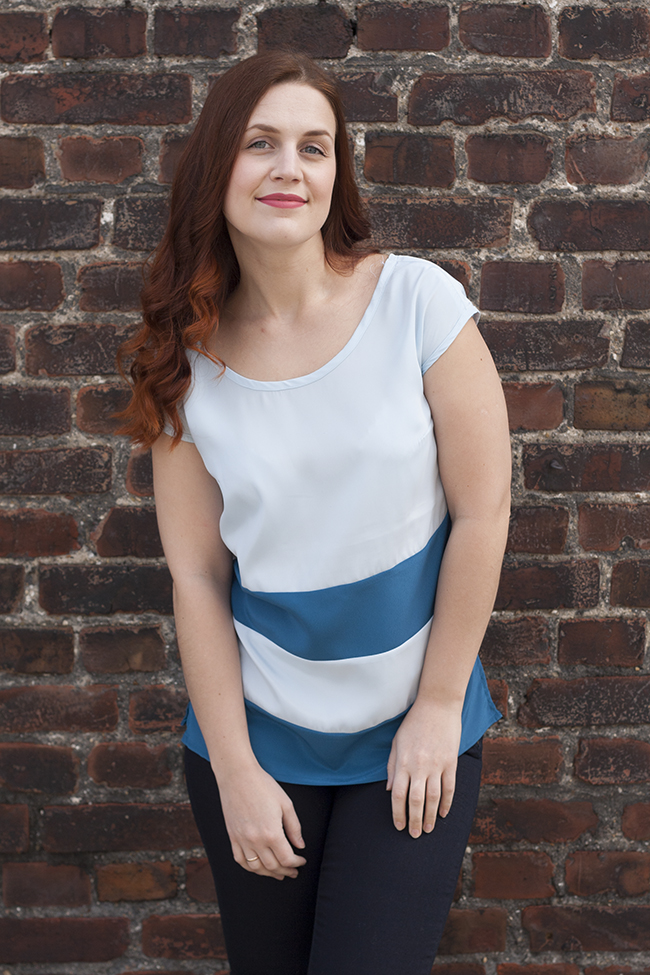
Refashionista Basics // Lengthening a blouse with color blocks

I know Refashionista Thursdays were almost becoming a thing on the blog, but a Refashionista Friday is also cool right? So, a couple of weeks ago I said I was going to do more basic refashions over the course of the next few months, and today's refashion is all about a very basic fix.

How many times have you cast aside a blouse or a t-shirt that was just too short? I know I have done it numerous times. I have quite a long torso, so a lot of blouses tend to be too short for me. Adding some color blocks is just the perfect solution! Are color blocks still in vogue, by the way? You can make the blocks as colorful or neutral as you'd like - it's really up to you. 
I used teal blocks with this light blue blouse because it was in the same color way, but added just a bit of light-dark contrast. I tend to pick the more neutral path when it comes to colors because I always find styling really colorful clothing with other pieces in my wardrobe a challenge. But, if you're more adventurous, you could pick a completely contrasting color, or a patterned fabric, or even lace. There are many ways to go here, and they would all look equally awesome.
Funny story about this refashion is that I actually made this blouse myself a few years ago for my first Etsy collection. However, it didn't sell, and after I was done selling clothing on Etsy, I just kept it for myself. But, since I was not making it for myself, I had made it a bit shorter than would be ideal for my body. So, in my world, even the things I make from sctratch get a makeover sometimes.

 Here's the how-to:
 1) First, measure the desired length of your blouse and deduct the actual length to know how much length you need to add. I knew I wanted to add 20cm, because I really like longer tops at the moment. Then, think of how many blocks you'd like to do. I did two 10cm blocks, but I could have gone for three 7cm-wide blocks, or even four 5cm-wide blocks. That's completely up to you. (I was just feeling a little bit lazy, to be honest. I love sewing, but I love instant gratification even more.)
Once you have you block width figured out, cut the blouse into as many pieces as needed. I did 2 blocks, so I just cut off one 12cm-wide piece from the bottom. Why 12cm? First, I wanted all my blocks to be equal in width, and second you need to add sewing allowance to your block width.
2) Cut the color blocks from another fabric. So, I would recommend using the same type of fabric (satin with satin, cotton with cotton, jersey with jersey), or you could add lace as blocks (you know I love my lace), but then also match wovens with wovens and knits with knits. Just saves you a lot of headache is all. 
I used the cut-off part of the blouse to make sure the new fabric blocks were the same size. 
3) Lay out your blocks, so you can see you have all your pieces ready and for the ease of the next steps as well. It's especially useful when your blouse flairs out at the bottom, and your blocks are not the same size.
4) Zig-zag or serge the side edges of the block fabric pieces. Also, unpick the side seam of the cut-off blouse part, and about 5cm of side seam on the upper blouse part.
5) Sew the blocks together. I feel the easiest way was to sew the three detached pieces to one another in a random order and then attach that big block to the to blouse piece. I chose to sew the vertical seams before the side seams because I simply find it easier. 
6) Once all the color blocks are sewn together and attached to the blouse top, zig-zag or serge all raw edges and give all seams a good press with the iron. Ironing is so important, you guys! It makes everything look 100x better.
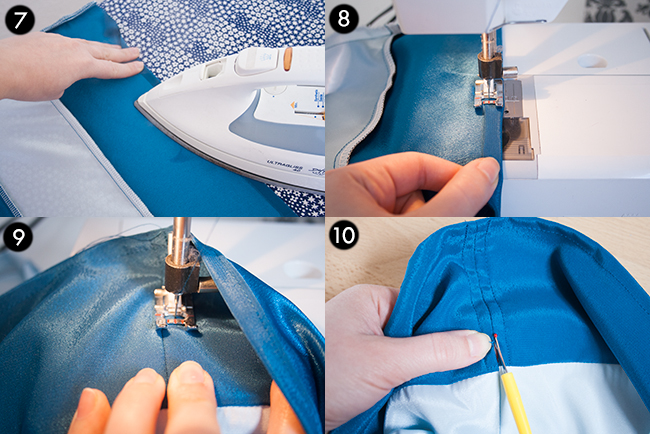
 7) Onto the hem! I alwyas always press the hem in place before sewing. When the hem is already flat, it's soooo much easier to sew. So, fold the hem and press. I usually even don't need pins to hold the hem in place after a good press.
8) So hem with a straight stitch.
9) After all that, I discovered the blouse needed side seam vents, because my bum is too big. You might not have this problem, so these last two steps are optional. 
For a side seam vent, just sew a parallel seam about 0.5cm from the side seam on both sides of the side seam (side much?). The seam looks like a rectangle with one of the shorter sides being the edge of the blouse. Makes sense? I should have added a line there with photoshop, but I hope you get it.
10) Use a seam-ripper to unpick the side seam inside the rectangle. And done!
Sometimes I find it so hard to gram a tutorial into one post, because really, there are always a lot of nuances that I don't get into since this has to be readable, right, but I feel like, if you're a novice sewer you might not no all these little things that seem like a given for a more advanced seamstress. 

Which is why I've been toying with the idea of creating some sewing courses. A lot of you have asked me about how I got started and some of your favorite posts seam to be the sewing ones. So, I'd love to hear from you! If I were to create a sewing mini course for beginners to learn the basics and get a wearable item at the end of the course, what would that garment be? Would you love to learn how to make a skirt? Or perhaps a blouse, or even a dress as your first garment? Let me know in the comments!

I'm also working on putting together a guide for getting started with sewing and some tips for sewing with knits, so there will be lots of support for you ready to start sewing very soon on the blog.

I wish you a wonderful Easter weekend!
xo. Hanna

2015/04/01

DIY Lace Stud Earrings

Happy April Fools! Did you get any good pranks today? I'm very easy to fool since I forget about the date, even during the day, and so I'm just thinking it's an ordinary Wednesday. Or I'm simply naive. But, let's go with the first version, ok?

I wanted to say a huge thank you to everyone who participated in the Etsy send-off party with the purchases. The shop is now officially closed, and I'll be removing the link from the menu bar as well. I'll be writing more in depth about all the lessons learned soon.

Enough of chit-chat - let's get down to business! Lace earrings have been on my mind for a while, but somehow I haven't gotten around to making any before now. In my earring-making frenzy last week, I suddenly had a burst of inspiration and voila, lace earrings. These are so easy to make, it almost feels like cheating. So, if you've ever wanted to get into jewelry-making, but been intimidated by the tools and wires and techniques, simple stud earrings are the perfect place to start. You cannot do it wrong! 
 Supplies needed:
1) Venice style lace
2) Scissors
3) Mod Podge
4) Small painting brush
5) Earring studs
6) Super glue
7) Plastic bag 
 Here's the how-to:
1) Cut 2 suitable motifs for the earring from the venice lace.
3) Add a drop of water to Mod Podge (until it's runny) and paint over both sides of the lace motifs. Protect the underlying surface and the motifs by laying a plastic bag under them for this step.
4) Let completely dry before gluing the studs to the backside of the lace. Once the glue has dried, you can wear your new studs.
Ridiculously simple, right? You might be wondering why I messed with the Mod Podge in the first place. Well, the lace itself is soft, but I wanted the earrings to have a good form, and be at least somewhat stain-resistant. And infusing them in Mod Podge did just that.

Happy crafting!
xo. Hanna
Next Post Previous Post Home