


I know Refashionista Thursdays were almost becoming a thing on the blog, but a Refashionista Friday is also cool right? So, a couple of weeks ago I said I was going to do more basic refashions over the course of the next few months, and today's refashion is all about a very basic fix.
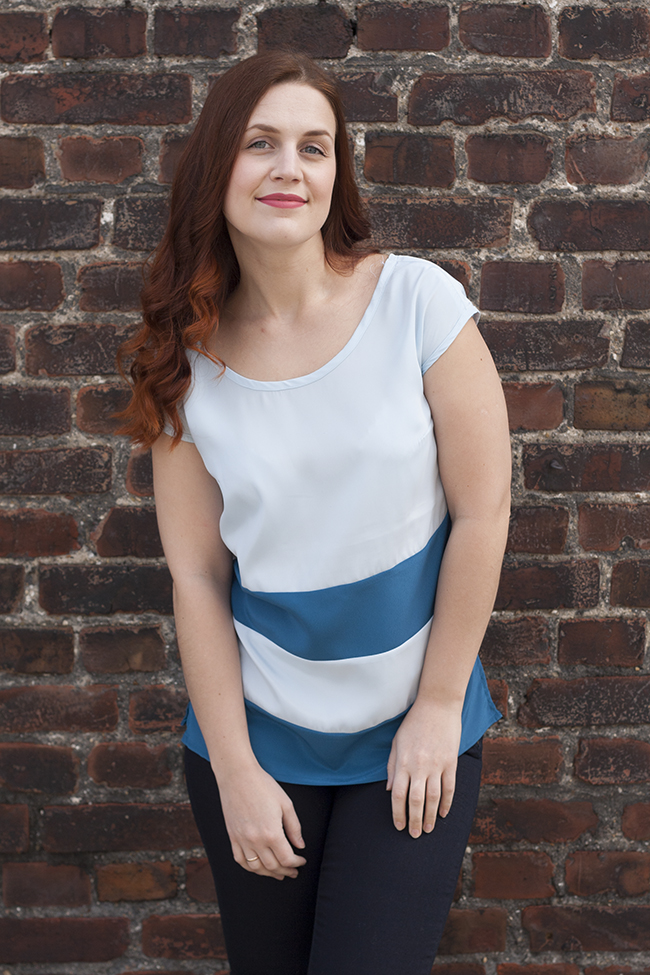
How many times have you cast aside a blouse or a t-shirt that was just too short? I know I have done it numerous times. I have quite a long torso, so a lot of blouses tend to be too short for me. Adding some color blocks is just the perfect solution! Are color blocks still in vogue, by the way? You can make the blocks as colorful or neutral as you'd like - it's really up to you.

I used teal blocks with this light blue blouse because it was in the same color way, but added just a bit of light-dark contrast. I tend to pick the more neutral path when it comes to colors because I always find styling really colorful clothing with other pieces in my wardrobe a challenge. But, if you're more adventurous, you could pick a completely contrasting color, or a patterned fabric, or even lace. There are many ways to go here, and they would all look equally awesome.

Funny story about this refashion is that I actually made this blouse myself a few years ago for my first Etsy collection. However, it didn't sell, and after I was done selling clothing on Etsy, I just kept it for myself. But, since I was not making it for myself, I had made it a bit shorter than would be ideal for my body. So, in my world, even the things I make from sctratch get a makeover sometimes.
Here's the how-to:

1) First, measure the desired length of your blouse and deduct the actual length to know how much length you need to add. I knew I wanted to add 20cm, because I really like longer tops at the moment. Then, think of how many blocks you'd like to do. I did two 10cm blocks, but I could have gone for three 7cm-wide blocks, or even four 5cm-wide blocks. That's completely up to you. (I was just feeling a little bit lazy, to be honest. I love sewing, but I love instant gratification even more.)
Once you have you block width figured out, cut the blouse into as many pieces as needed. I did 2 blocks, so I just cut off one 12cm-wide piece from the bottom. Why 12cm? First, I wanted all my blocks to be equal in width, and second you need to add sewing allowance to your block width.
2) Cut the color blocks from another fabric. So, I would recommend using the same type of fabric (satin with satin, cotton with cotton, jersey with jersey), or you could add lace as blocks (you know I love my lace), but then also match wovens with wovens and knits with knits. Just saves you a lot of headache is all.
I used the cut-off part of the blouse to make sure the new fabric blocks were the same size.
3) Lay out your blocks, so you can see you have all your pieces ready and for the ease of the next steps as well. It's especially useful when your blouse flairs out at the bottom, and your blocks are not the same size.
4) Zig-zag or serge the side edges of the block fabric pieces. Also, unpick the side seam of the cut-off blouse part, and about 5cm of side seam on the upper blouse part.
5) Sew the blocks together. I feel the easiest way was to sew the three detached pieces to one another in a random order and then attach that big block to the to blouse piece. I chose to sew the vertical seams before the side seams because I simply find it easier.
6) Once all the color blocks are sewn together and attached to the blouse top, zig-zag or serge all raw edges and give all seams a good press with the iron. Ironing is so important, you guys! It makes everything look 100x better.
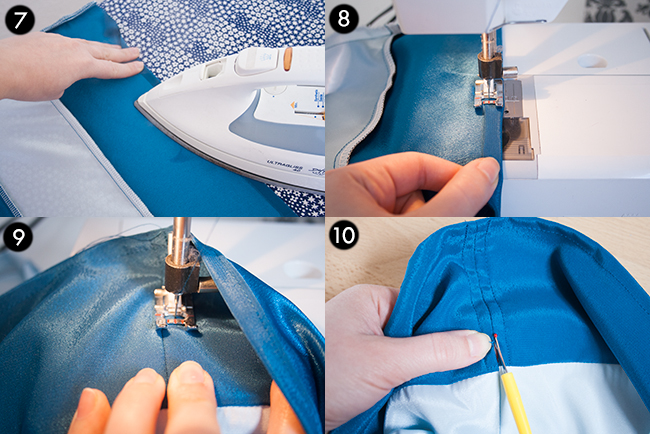
7) Onto the hem! I alwyas always press the hem in place before sewing. When the hem is already flat, it's soooo much easier to sew. So, fold the hem and press. I usually even don't need pins to hold the hem in place after a good press.
8) So hem with a straight stitch.
9) After all that, I discovered the blouse needed side seam vents, because my bum is too big. You might not have this problem, so these last two steps are optional.
For a side seam vent, just sew a parallel seam about 0.5cm from the side seam on both sides of the side seam (side much?). The seam looks like a rectangle with one of the shorter sides being the edge of the blouse. Makes sense? I should have added a line there with photoshop, but I hope you get it.
10) Use a seam-ripper to unpick the side seam inside the rectangle. And done!

Sometimes I find it so hard to gram a tutorial into one post, because really, there are always a lot of nuances that I don't get into since this has to be readable, right, but I feel like, if you're a novice sewer you might not no all these little things that seem like a given for a more advanced seamstress.
Which is why I've been toying with the idea of creating some sewing courses. A lot of you have asked me about how I got started and some of your favorite posts seam to be the sewing ones. So, I'd love to hear from you! If I were to create a sewing mini course for beginners to learn the basics and get a wearable item at the end of the course, what would that garment be? Would you love to learn how to make a skirt? Or perhaps a blouse, or even a dress as your first garment? Let me know in the comments!
I'm also working on putting together a guide for getting started with sewing and some tips for sewing with knits, so there will be lots of support for you ready to start sewing very soon on the blog.
I wish you a wonderful Easter weekend!
xo. Hanna


Oooo, I love the idea of two lines of color! I've tried lengthening a shirt with one block of color before, but it just seems like an afterthought and obvious that I was just lengthening an ill-fitting shirt. This is a great plan! Thanks!
ReplyDeleteI know what you mean, Kelly! It's always a struggle to find ways to alter clothing without it looking too obvious. Glad I could give you a new idea!
DeleteI think it's a matter of farbic - when you find one that has a similar texture, it won't look obivious. I've done it with one dress I run out of fabric to make long enough. At first I combined blue with green, but the fabrics were too different. Then I swatched the green part for a patternd fabric in neutral tones with some blue accents and now the dress looks store bought (yeah, you can totally say I'm quite proud about that :D )
DeleteNõustun eelmise kommentaariga kahe triibu geniaalsuse osas :)
ReplyDeleteplease please make a learning to sew course!! I am trying to make a circle skirt but I'm having a tough time being able to fit it together in the 4 quadrants.Thanks for being great though!
ReplyDeleteI'm working on putting together a course outline right now, actually. I just have some more planning and market research to do before I go ahead with it. But, thanks for letting me know you'd be interested!
Delete