Showing posts with label beading. Show all posts

2014/11/05

DIY Painted Wooden Beads necklace

Although I love the statement necklace trend, I don't own very many. When it comes to jewelry, I'm more of a earrings type. I don't wear necklaces nearly as often as I'd like to. And, I think part of the problem is that I don't like spending money on trendy jewelry that might not get as much wear or might go out of fashion next year. So, I thought I'd make myself a necklace that would be bold enough to make a statement yet subtle enough for my taste.
 This necklace is super simple to make. You don't even need fancy jewelry making equipment to create it. Just a few beads and nail polish is about it.

Supplies:

  • 3 wooden beads (1 with a diameter of 3cm, and 2 with 2.5cm)
  • Nail polish in the color of your choice
  • Tooth picks
  • Shot glasses or somewhere to hang the beads to dry
  • necklace chain (as long as you want the necklace to be)
  • hook-eye closure
  • 2 small 5mm connection rings
  • /or buy a ready made chain necklace

 STEP 1
Choose three bold nail polish colors for your necklace design. I chose teal, orange red and turquoise.
 Insert a tooth pick through one of the beads and start painting half of the bead in the first color. Once you're done, set it on the shot glass to dry.
Repeat with the other two beads and nail polish colors.
 STEP 3
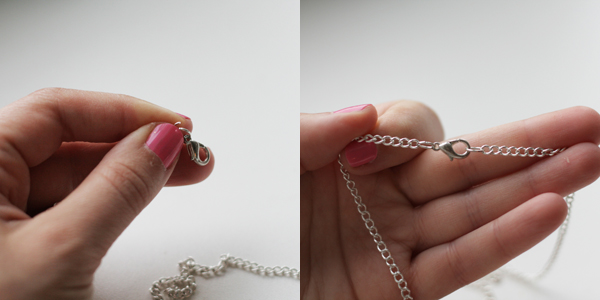
Pull one of the connection rings open, insert the hook closure and one end of the chain, and push it back closed. Then, take the other connection ring, pull it open and insert the other end of the chain, close the ring.
You can skip this step if you use a ready-made chain necklace.

STEP 4
Once the beads have dried, pull the chain necklace though the beads, and you're done!
Wasn't it simple? Sometimes, describing the making process is so much more difficult than the making itself.

I've gotten a lot of wear out of my necklace already, so I'm thinking about making another variation, maybe this time in metallics and black. We'll see...

Happy making!

xo. Hanna

2013/02/18

Refashionista: Pearls & sequins embellished shoulders


Restyling a sweater can be as simple as adding some pearls and sequins on the shoulder creating a whole new feel. The idea came to when browsing Pinterest and seeing all those statement shoulders with lots of bling. And the process is so simple, all you need is some pearls, sequins, a needle and thread and time.


I love all that jazz! I only wish I had more patience to create an even more dramatic shoulder. The beading took a little bit more time than I'm used to spending hand-beading, but I'm loving the end result. There a few more easier techniques you could use to create this effect, but that's another post.

2012/10/09

Pearls are a girls best friends


I know it's diamonds, but pearls are on the second place, right? I love pearls (shocker, I know)! I don't know about you, but my Mother always says a grown women should have a pearl necklace. It's a symbol of an elegant mature women. So, naturally, when my teacher's big birthday came up last month I turned to pearls.

I knew I wanted to give her something I made myself and I also knew I wanted it to be something special. I went through my stash and found a handful of fresh water pearls. Just enough to create this three strand necklace. I had a bit of trouble getting the length just right for every strand, but in the end it turned out beautifully. And she seemed to like it. And that's the main thing.

It's funny how I've totally rediscovered jewelry making recently. The more I create, the more ideas I have. I'm sure you'll see more jewelry projects here on the blog as well in the future.

How about you - are you a diamonds or a pearls kind of girl?

2012/09/18

Beading Basics: Memory wire bracelet


I remember when I first started making jewelry. I bought just a few notions to make earrings, and after making my first pair of earrings, I was hooked. I was so excited to make my own jewelry - I could make a new pair of earrings every day and the possibilities were endless. 

The basics are pretty simple and once you've mastered them, you can always learn more. But, I think having the basic skills will give you so much more freedom in your style, because you can design and make your own custom jewelry that's 100% you and nobody else has it. 

So, here's a simple project perfect for a beginner.


You'll need:
1. Beads - I used an assortment of different size beads that I had left over from previous projects.
2. Memory wire - it's a pre-bent wire that holds it's shape. You'll need the bracelet size.
3. Wire cutters - the one tool you can't do without when working with wire.
4. Round nose pliers - there are all kinds of pliers, but in my opinion, the round-nosed ones do the trick most of the time.


The steps are very simple and self-explanatory, but just in case:
1. Start beading the wire. I just crabbed the beads at random differing between smaller and larger ones to create a nice textured but non-symmetical look.
2. Just keep adding beads on the wire as long as you have as many bracelet layers as you'd like to have. I went for 5.
3. Bend a loop to one end of the wire.
4. Make sure all the beads are nice and tight and cut the wire about 1cm after the last bead. Bend the tip just like you did the other end.
5. There you have it!

My beading terminology is so bad in english, but hopefully the pictures speak for themselves. If you have any questions, don't hesitate to ask in comments or via email. I'll do my best to answer.

Previous Post Home