Showing posts with label t-shirt. Show all posts

2015/05/05

DIY No-Sew Sequin Scissors T-shirt

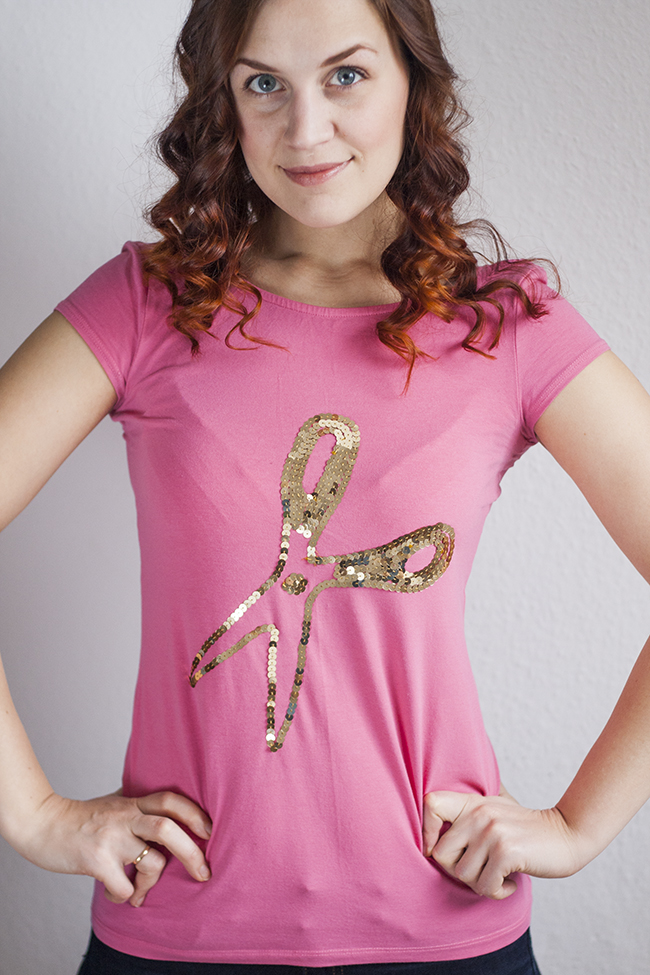
I rarely wear simple T-shirts, but I got this pink one for our engagement photos. Since it was pretty sad in my closet, I thought I'd spice things up. And, what better way to do it than to add some sparkling scissors. This one has Pearls and Scissors (literally) written all over it!
 I made this project for the Mood magazine a couple of months ago. You know, doing DIY projects as a job is so much different than just doing them for fun. It's a little like making something for someone else and you don't exactly know what they like. But, I still try to come up with things that I would actually love to make for myself. After all, I'm the one who has them in my closet once the article's been published.

Luckily, so far I've loved most of the projects I've made. And this one is definitely 100% me!
This is what you need:

  • T-shirt
  • Glitter string
  • Big scissors
  • Fabric pen or other fabric marking tool
  • E6000 glue or fabric glue (+ a match or toothpick for precision glueing)

 STEP 1

Put the scissors on the T-shirt the way you want them and trace around the scissors with a fabric pen or any other fabric marking tool (like Taylor's chalk or a chip of soap).

STEP 2

 Use a toothpick or match to apply some glue to the back of the glitter string and start glueing it along the template line. After i did the outer line, I went back and covered the inside of the scissor handles as well. Finally, I added the little joining screw out of sequins.

A tip I would have to cover the end of the string with a few loose sequins whenever you need to cut and restart.

It's a very quick and easy project, and holds up very well in the wash. Also, your kids/cousins/nephews and nieces/any other small children can pull on scissors (which they will) and the glue will hold. It's babysitter proofed, so you can take my word for it!
If the Start Sewing Club had an official club T-shirt, this would be it. I love this T-shirt more than any other I've owned. It's definitely getting a lot of wear these days, which in my book is the best indication of a DIY success.

I've been welcoming the first members to the Start Sewing Club and I couldn't be more happy about it! I'd love to have you as well, so do consider joining. (Have you seen the video introduction yet?)

There won't be another club before Fall. And, the next one will have all new projects. You will have lifetime access to the classes in this edition of the Club, so if you think you'd like to take them, get them now for a good price! Also, if you hop on the mailing list below, you could still catch the earlu bird special I have running for the list only ;)

I'd be beyond excited to have you in the club!

xo, Hanna


2014/10/07

Sewn // A skirt and t-shirt for Mari Krõõt

Sometimes I do a little selfless sewing. Yes, I know, big shocker, but I do. I'm a good friend/wife/daughter like that. But, I have to admit, that it's way more difficult than sewing for myself. I know my body so well after years and years of sewing, but other people have a different body and I don't always know how to establish the best fit on them. Which is why these types of projects are such a learning curve for me.
Which brings me to this two projects. A really simple pleated skirt (you can find the tutorial on OEH here) and a pretty t-shirt from a Burda pattern. 
I knew that Burda patterns can be on the big side with too much ease, but I wasn't expecting the need to take in more than 10cm from the bust and waist, even though the measurements fit the chosen size perfectly.
All is well that ends well right? Well, after some trial and error we got the fit right and I think this look is so pretty on Mari Krõõt. A fitted top with a gathered skirt is the perfect look for curvy girls, I think. It highlights the waist and creates a beautiful hourglass shape.
Oh, and the whirl! That's the main thing. What do you think? I'm totally diggin' this look.

And, don't forget to enter the awesome halloween giveaway!

xo. Hanna
Follow on Bloglovin

2014/08/12

Super simple dotted t-shirt DIY

Hi, guys! You can barely call this a tutorial, but since I've been on a fabric paint crush lately, I thought I'd share this t-shirt experiment with you. It's one of those I-have-10-minutes-to-make-something kind of things. It's super simple and very fast, so if you have a t-shirt you'd like to update, give it a try.
I found this t-shirt at home and wasn't too excited about it. I knew it needed a little face-lift. I did this makeover in July on a day I really needed a change from cutting out and clueing together wedding decor. But, I didn't want to spare too much precious time doing something non-wedding-related, so I thought I'd play around with my new love of fabric paint for 15 minutes. This is what I did:
All you need is some fabric paint in your color of choice and an old wine cork as a stamp for the dots. The process itself was super simple. Simply lay out your t-shirt and place a plastic bag inside, so that the paint won't run through to the backside. And, dot away! I did my dots in a completely random pattern, but you could use a ruler to mark the place of the dots with small dots first to space them evenly.
Although I wouldn't call this my favorite t-shirt, I do like it a lot more now. I'm thinking about covering the whole t-shirt in dots. What do you think? Cover it in dots, or leave as is? Let me know in the comments!

xo Hanna

Credits // Author: Hanna Saar // Photography: Hanna Saar and Rein Saar

2014/07/10

DIY Paint splatter t-shirt

Hey, guys! It's been a while since I did a DIY on the blog, so I'm excited to share this tutorial with you today. It's a simple project suitable for a complete DIY newbie, so if you've been meaning to make your first project, but don't know where to start, try this to get the ball rolling.

I've been wanting to experiment with fabric paint for quite some time now, and then one day I got this idea to make a paint splatter t-shirt. I think we all remember this technique from elementary school. You don't need to be an artist to create amazing patterns with this method. So, I bought some paint and went for it.

You will need:

  • Plain t-shirt (a light color is best, although they do sell fabric paint for dark colored fabric as well)
  • Fabric paint (I used 3 different colors from Dylon: deep pink, yellow, and turquoise)
  • Small artist brush (the exact size depends on your preference)
  • 1 big trash bag
  • 2 plastic bags
  • scrap fabric for practice
STEP 1

Prep your crafting area for paint. Cut a big trash bag open and lay it one the ground. The fabric paint does come off easily with water, but who wants to spend extra time cleaning up after. Also, prep your t-shirt by placing one (or 2, depending on the size) plastic bag inside the t-shirt. This prevents the paint from leaking through to the other side of the tee.

STEP 2 (optional)
Practice your splatter technique on a scrap piece of fabric to get you wrist action and tapping action going. Also, this will give you a good idea of how much paint to put on the brush, if you need a thicker brush, or if your happy with the pattern you're creating. I was happy with my platter, although I initially thought the splatter would be bigger. For me, the smaller splashes and dots were ok, but you might want to try out different size brushes.

STEP 3
Once your happy with your technique and splatter size, it's time to splatter on the first layer of paint. I wanted my splatter to cover only one half of the t-shirt front and run diagonally from one shoulder to the opposite corner. 
I used the darkest color first, but you can choose the order yourself. Once your happy with your first layer, let dry. 

Repeat with the other fabric paint colors and once your happy with the design, let it dry completely. Once it's dry, iron it as instructed on the paint label.

I think this t-shirt turned out pretty cool, so I'm dreaming up new ways to use fabric paint. I love wearing my new tee with my overalls. Makes me look bad-ass (or so I think).

Have fun splattering!

xo Hanna

P.S. I developed this tutorial for the Estonian fashion magazine MOOD (it was published in the May issue), and they were kind enough to let me share it with you as well.

2014/05/01

Refashionista: Women's into men's long-sleeved t-shirt


Can you believe it's May already? It's getting hectic at school, which means it's going to get slow around the blog. But, before I bury myself into music history books, I've got some refashions and tutorials to share.

Today's refashion is one of the very few refashions I've done for men. It's not that I don't like sewing for men. I love men's fashion, sometimes even more than women's. The problem is finding the material for the refashions. As you probably all know, most men wear their clothing to rags, so thrifting refashionable men's wear in good condition is a rare occasion. Then, one day I had an idea. Why not use women's clothing as the basis for refashioned men's wear? It seemed like the perfect solution. So, I headed out to our local thrift stores, and found this XL women's long-sleeved tee, which translated into a well-fitting men's M. Yes, I do pat myself on the back for this one (lol).


As you can see, I changed quite a few things. The first things I needed to figure out was the neckline. The original neckline was way too wide for a man, so I had to make it narrower somehow. Since there was no excess fabric to work with, I opted for a deep brown jersey to compliment the original turquoise. To alter the neckline, I removed the existing neckband and cut the neckline into a round V-neck. The much wider neckband helped to make the neckline narrower and more men-appropriate.


The contrasting neckband needed some additions to create a cohesive look, so I added a small chest pocket, added some brown to the sleeve hems and also added elbow patches. Those suckers were difficult to sew on, as you can see from the photo below. Lets just say, that if you ever consider adding elbow patches to an already sewn sleeve, patience and basting are your best friends.


I'm totally smitten with the way this refashion turned out. I think Rein looks so handsome in it -turquoise is the perfect color for him. Maybe I'm a bit biased here, but I love this tee on him! I looking forward to transforming more women's wear into men's wear.


Follow on Bloglovin

2014/03/15

DIY Two into one t-shirt on Oh Everything Handmade


I always try to make time for sewing on weekends, but, I must admit, there's never as much time as I'd like. Sometimes I only have 20 minutes to spare. That's when this super simple refashion came into being. You can find the tutorial and more pics over at Oh Everything Handmade.

Have a creative weekend!


Follow on Bloglovin

2013/09/10

Refashionista: Circle cutout t-shirt


T-shirts are an endless source for refashions. I rarely wear a simple t-shirt, yet I love a comfy style, so adding a little oomph to an otherwise boring garment is one of my favorite things to do. This t-shirt was not really boring, rather than too cutesy with the deer on the front, and had some serious yellow stains that didn't come out in the wash.


I've been meaning to try out some cutout circles, and this t-shirt seemed just the right target for that kind of experimentation. So, I took three different size glasses out of the kitchen cupboard and got to work. I used the same basic technique as with the heart cutout tee, but instead of the heart shape I used the glasses as templates.


I think the idea itself is good, though I'm not extremely pleased with the end result. I think the biggest glass was a bit too big, and I should have maybe added even more circles. Right now they seem a little bit too random. What do you think? Yey or nay?


2013/07/09

DIY Lace pocket t-shirt


Summer is the time I miss t-shirts in my wardrobe the most. During the other 9 months of the year, I don't really wear them much, but in the summertime they become a wardrobe necessity. They're the perfect thing to pair with a maxi skirt or shorts. And white is the perfect color since it goes with everything. So, of course I had to make another white t-shirt.

 
I used the same pattern that I drafted here. You can get all the instructions for your own pattern in that post, so I won't add the tutorial here. There were a couple of things I did differently this time. Firstly, I didn't split the patter pieces, so no lace upper bodice this time. Just a plain white tee would have been too boring, so I added a simple lace pocket for visual interest. It's hard to see it in the pictures, but it looks great in real life.


This tee has already served me well. It's perfect with jeans, shorts, and skirts. Not too fancy, not too plain. Just right!


I haven't gotten behind my sewing machines in a few weeks and I miss them. But I'm back in the city for the next 2 weeks, so we'll have plenty of face time, I'm sure. And hopefully, I'll get round to making some of the things on my "need desperately" list.

Happy sewing, my friends!


Previous Post Home