


This was my first and to this date the most popular tutorial I have made. So, I thought it would really be a crime not share it with you.

Lace can make a simple t-shirt so much more special and elegant. I'm not a t-shirt+jeans kind a gal, I usually don't wear simpel t-shirts, and that's exactly why I'm thinking of ways to make them just a little bit more special. If you're like me, I think you're going to love this tutorial. And this one.
Be sure to click "read more" to see the full tutorial.
- sewing machine
- one old or new simple t-shirt
- lace fabric, preferably stretch
- thread in matching color
- double-pointed needle (optional)
- sewing needle and thread in contrasting color
- scissors, pins
Step 1

Put the t-shirt on your sewing dummy or lay it flat on the ground. Pin the lace stretch fabric on the t-shirt, covering the area you want to embellish. For me, that was the front upper section.
Step 2

Take your sewing needle and contrasting thread and trace a line where you want the lace to end. I did it free-hand, because I wanted a wavy edge, but you can also use a ruler for a straight or curved edge. since I did mine free-hand, I did it only on one side and have to trace that to the other side in the next step.
Step 3

Trace the edge markings onto the other side. Fold the t-shirt in half and use pins or needle and thread, to trace the markings. I did it with the pins and after that traced the line with contrasting thread to make it easier to sew.
Trim off excess lace, but leave a couple of cm/an inch of seam allowance.
Step 4


Put the double-pointed needle on your sewing machine. Sew the upper edge of the embellishment. My upper edge coincided with the neckline seam, which is why I used a double-pointed needle. If your embellishment is somewhere in the middle of the t-shirt, use the method in step 5 (zig-zag stitch).
Step 5
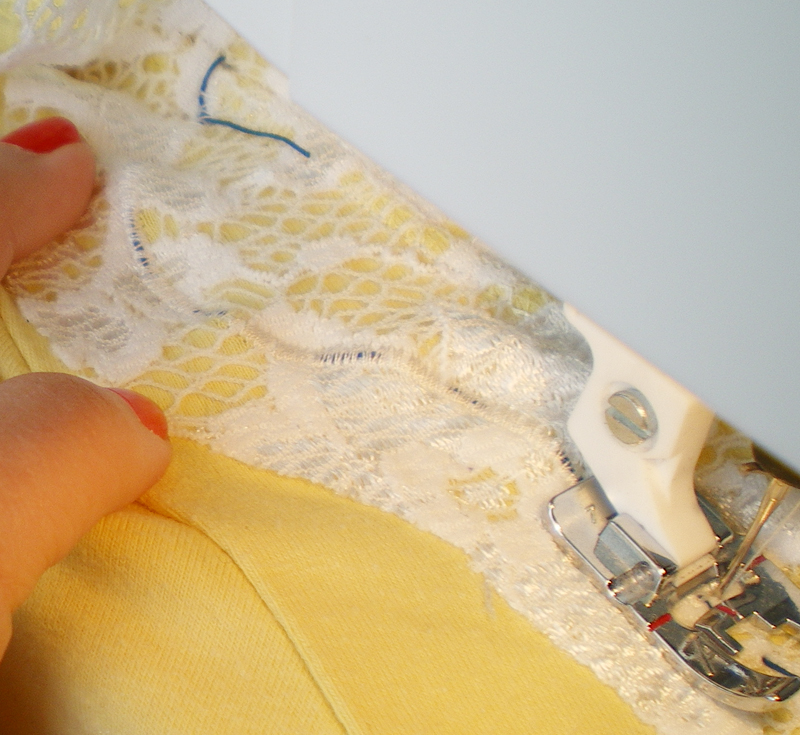
Switch to a standard jersey needle and continue with the lower edge of your embellishment. Set the machine to a dense zig-zag stitch, you can choose the width yourself. Sew along the marked line leaving the marking thread in the middle of the zig-zag stitch.
Step 6
After finishing the seams remove the marking thread and cut the seam allowances of the lace very close to the seams. Then turn the shirt inside out and cut the t-shirt fabric from the inside of the embellishment, close to the seams. Press the seams.
Voila!! You're finished!

This method can also be used on non-stretch fabrics, so the possibilities are endless. If you have any questions about this tutorial, please leave a comment and I'll try to help. Side note! Since a red t-shirt colored my lace in the washing machine I had to bleach it. That's why the color in the after pictures is much lighter than in the tutorial pictures.
Special thanks to Marianne for modeling the t-shirt for me!


This is amazing. I can't wait to try this... and will be sure to share photos with you when I'm done :)
ReplyDeleteHow's the time management experiment going btw?
x Elena @ Randomly Happy
The first 2 days went great, but the weekend was a mess. I just can't keep a schedule on weekends, but the list of things did help to focus my activity on the things that need to get done. I'm definitely going to try and continue keeping a list and at least trying to divide that list over the week to get more things done.
DeleteI'll be looking forward to your pictures of the finished project!
Sellest viisist sai koheselt mu lemmik, kui esimest korda proovisin. Olekski viimane aeg üks kleit sarnasel moel ette võtta!
ReplyDeleteVäike mõte sulle ka nimekirjade osas, kuna ülal see jutuks uuesti tuli. Naudi ka lihtsalt koostamise protsessi, sellisel juhul ei tundu kirja pandud asjad mitte niivõrd kohustuste kui meelepäraste tegevustena. Ja ära kurvasta, kui mõni asi jääb tegemata. Mina olen sellistel puhkudel pannud märkmiku vahele lisamärgistused nendesse kohtadesse. Ja süsteem nähku välja ilus, see aitab tegutsemisindu säilitada. Kuidas ilusaks teha, tead sa ise väga hästi :)
Mul on ikka natuke kurb meel ka, et ma selle rohelise ülikhuuli seeliku Helile kinkisin... Aga mis teha, kui ma ise selline pontsik olen!
ReplyDeleteAga muidu on asjad ikka nii, et oled marutubli!
Ma vaatan, et see seelik on sul ikka hirmsasti hinge peal.. Kui leian kuskilt sarnase kampsuni, siis teen sulle ka ühe sellise. Üks erkroheline seelik ootab mul omanikku, aga see on ehk liiga ere sinu jaoks. Mõtlen su peale ja ehk leian sulle midagi sobilikku.
DeleteMa armastan sind!
DeleteMina sind ka! Mul on täna sinu jänkudega sokid jalas, nii et oled mulle kohe natuke lähemal.
DeleteLove this idea, what a great way to dress up a t-shirt. Is the skirt your model is wearing made from a sweater? If it is, do you have a tutorial for this also?
ReplyDeleteThe skirt is indeed made from a sweater. The same sweater as my diy socks, in fact. I used to make them for my Etsy shop. I do actually have a tutorial for that as well, but it's going to be a guest post at Merrick's Art blog, so you'll have to wait a couple of weeks to see it. But I'll definitely post about it when it goes live so you can check it out.
DeleteVery cute idea and looks so pretty!!
ReplyDelete